---
title: How to Create and Maintain Website Widgets
description: How to Create and Maintain Website Widgets
---
[Skip to content](https://support.customer-alliance.com/v2-knowledge-base/how-to-create-and-maintain-website-widgets#main-content)
- [English](https://support.customer-alliance.com/v2-knowledge-base/how-to-create-and-maintain-website-widgets)
- [Deutsch](https://support.customer-alliance.com/de/v2-knowledge-base/how-to-create-and-maintain-website-widgets)
- [Français](https://support.customer-alliance.com/fr/v2-knowledge-base/how-to-create-and-maintain-website-widgets)
- [Italiano](https://support.customer-alliance.com/it/v2-knowledge-base/how-to-create-and-maintain-website-widgets)
English
Show submenu for translations
[Open a Ticket](https://support.customer-alliance.com/v2-knowledge-base/kb-tickets/new?hsLang=en) [Customer portal](https://support.customer-alliance.com/tickets-view?hsLang=en)

Open main navigation
Close main navigation
- - [English](https://support.customer-alliance.com/v2-knowledge-base/how-to-create-and-maintain-website-widgets)
- [Deutsch](https://support.customer-alliance.com/de/v2-knowledge-base/how-to-create-and-maintain-website-widgets)
- [Français](https://support.customer-alliance.com/fr/v2-knowledge-base/how-to-create-and-maintain-website-widgets)
- [Italiano](https://support.customer-alliance.com/it/v2-knowledge-base/how-to-create-and-maintain-website-widgets)
English
Show submenu for translations
- [Open a Ticket](https://support.customer-alliance.com/v2-knowledge-base/kb-tickets/new)
- [Customer portal](https://support.customer-alliance.com/tickets-view)
- [Contact us](mailto:support@customer-alliance.com)
[Contact us](mailto:support@customer-alliance.com)
How can we help you?
- There are no suggestions because the search field is empty.
1. [Customer Alliance Knowledge Base](https://support.customer-alliance.com/v2-knowledge-base?hsLang=en)
2. [Getting started](https://support.customer-alliance.com/v2-knowledge-base/getting-started?hsLang=en)
# How to Create and Maintain Website Widgets
## Displaying customer reviews on your website builds trust and increases conversions. Our widget management dashboard allows you to build, customize, and embed live review feeds directly onto your site pages.
### **Understanding the Widget Dashboard**
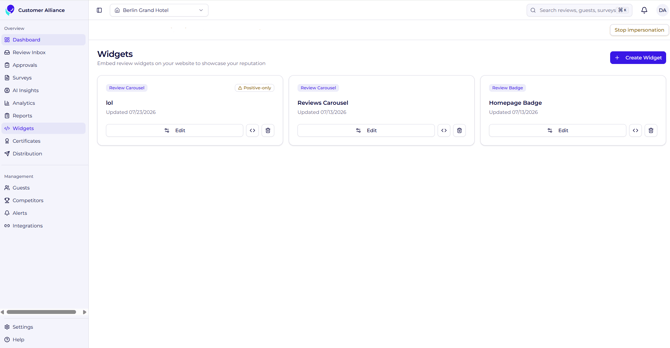
Navigate to the **Widgets** section in your dashboard to view and manage all active display units across your properties.
Each widget card displays key operational details:
- **Widget Name:** Your internal label (e.g., *Homepage Badge*, *Reviews Carousel*).
- **Widget Type:** The layout format (e.g., *Review Carousel*, *Review Badge*, *Floating Widget*).
- **Display Filters:** Active criteria determining which reviews appear (e.g., *Positive only*, *4+ Stars*, *All Reviews*).
- **Last Updated:** The date changes were last saved to that specific widget configuration.
### **1. Create a New Widget:**
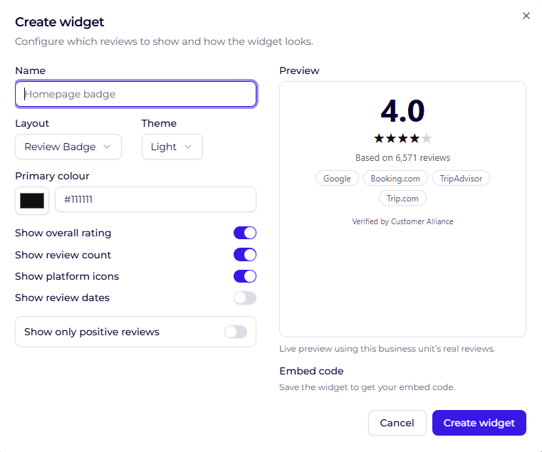
1. Click the **+ Create Widget** button in the top-right corner of the dashboard.
2. Select your target property or location (e.g., *Berlin Grand Hotel*).
3. Choose a layout style (Carousel, Badge, List, or Grid).
4. Configure your display rules (e.g., filtering to display only positive reviews).
5. Save your new widget setup.
### **2. Embed the Widget on Your Website:**
1. Locate the widget card on your main dashboard.
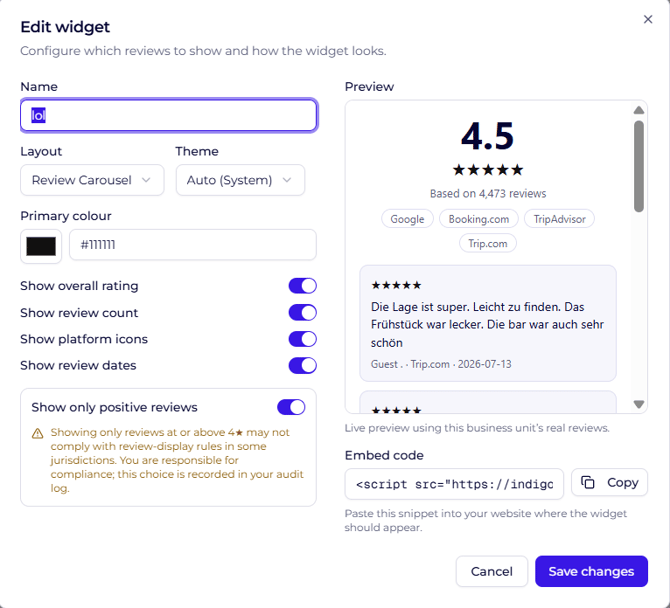
2. Click the **Embed Code** (`<>`) icon on the card to open the code modal.
3. Copy the generated code snippet to your clipboard.
4. Paste the snippet directly into the HTML of your website header or desired page section.
### **3. Maintain and Edit Existing Widgets:**
1. Click the **Edit** button on any active widget card to adjust display settings, update review filters, or alter the layout style.
2. Click **Save Changes**.
**Note:** Any changes saved in the dashboard update automatically on your live website, you do not need to re-embed the code snippet.
- [Getting started](https://support.customer-alliance.com/v2-knowledge-base/getting-started?hsLang=en)
- [Settings](https://support.customer-alliance.com/v2-knowledge-base/settings?hsLang=en)
- [Integrations](https://support.customer-alliance.com/v2-knowledge-base/integrations?hsLang=en)
- [FAQs](https://support.customer-alliance.com/v2-knowledge-base/faqs?hsLang=en)
[.svg "Customer-Alliance-Horizontal-logo-on-light (1)")](http://www.customer-alliance.com)
[mailto:email@email.com](mailto:email@email.com)
Copyright © 2026, CA Customer Alliance GmbH